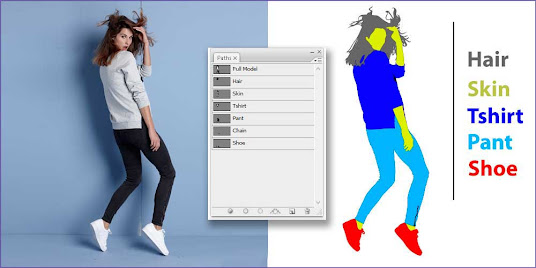
Multiple Clipping Path
Multiple clipping paths, also known as compound clipping paths or complex clipping paths, are used in image editing to create various levels of transparency or cut out multiple objects from their backgrounds. This technique is commonly used in graphic design, advertising, and e-commerce industries to achieve intricate image masking and isolation effects.
The process involves defining multiple clipping paths around different parts of an image, each creating a separate area of transparency. By doing so, you can effectively hide or reveal certain portions of the image, allowing for precise control over the visibility and composition of various elements within the picture.
Here's a step-by-step explanation of how to create multiple clipping path using popular image editing software like Adobe Photoshop:
Open the Image: Start by opening the image you want to work with in Photoshop or any other image editing software that supports multiple clipping paths.
Create Clipping Paths: Use the Pen Tool (usually found in the toolbar) to draw paths around the various objects you want to clip. For each object, create a separate path around it, ensuring that the paths do not overlap.
Save Paths: Once you have created all the individual clipping paths, save them as separate paths. In Photoshop, you can do this by going to the Paths panel and clicking on "Save Path." Give each path a descriptive name to keep things organized.
Turn Paths into Clipping Paths: With all the paths saved, go back to the Layers panel. Create a duplicate of the image layer (for safety) and hide the original image layer.
Apply Clipping Paths: Now, for each object, create a new layer above the duplicated image layer. Load one of the saved paths as a selection by Command/Ctrl-clicking on the path thumbnail in the Paths panel. Then, with the selection active, go to the new layer and click on the "Add Layer Mask" button. This will apply the clipping path to that specific layer, isolating the selected object from its background.
Repeat for Each Object: Repeat step 5 for each object, creating a new layer and applying the corresponding clipping path as a layer mask.
Refine and Adjust: After applying all the clipping paths, you can refine the masks and make adjustments to each layer as needed to achieve the desired final composition.
Export: Once you are satisfied with the results, save the image in an appropriate format (e.g., JPEG, PNG, TIFF) while preserving the transparency.
Keep in mind that creating complex clipping paths can be time-consuming and require a certain level of precision. For intricate images, it's often best to work with a professional graphic designer or image editing service to ensure high-quality results.


Comments
Post a Comment