Model photoshop alpha channel masking
Model Photoshop alpha channel masking is an advanced image editing technique used to precisely isolate models from their backgrounds, resulting in high-quality and professional-looking cutouts. This technique involves utilizing the alpha channel in Photoshop, which stores transparency information, to create detailed and accurate selections around the model's hair, fur, or other complex elements.


The standard image editing tools in Photoshop, such as the Magic Wand or Quick Selection Tool, may not always yield precise results when trying to extract models from busy or textured backgrounds. Alpha channel masking, on the other hand, provides a more refined and controlled approach to achieve seamless cutouts.
The process of model Photoshop alpha channel masking typically involves the following steps:
Image Selection: Clients provide high-resolution images of models that require background removal or isolation. These images often feature intricate hair or detailed elements that need to be preserved during the editing process.
Duplicate Layer: Start by duplicating the original image layer in Photoshop. This step ensures that the original image remains intact, and any changes are made to the duplicated layer.
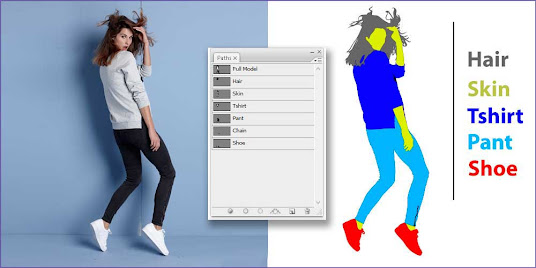
Create an Alpha Channel: In the Channels panel of Photoshop, create a new alpha channel. The alpha channel acts as a grayscale image where white represents opaque areas, black represents transparent areas, and shades of gray represent semi-transparent areas.
Selective Masking: Use tools like the Brush Tool and the Paint Bucket Tool to selectively paint or fill the alpha channel with black and white. Carefully paint the areas where the model's edges and fine details need to be preserved in white, and areas that should be removed in black.
Refinement: Zoom in to the image and refine the alpha channel by painting or erasing additional areas as needed to achieve a smooth transition between the model and the background.
Load Alpha Channel as Selection: Once the alpha channel is precisely created, return to the Layers panel and load the alpha channel as a selection by holding the Ctrl (Command on Mac) key and clicking on the alpha channel thumbnail.
Background Removal: With the selection active, go back to the Layers panel and apply a layer mask to the duplicated layer. The model will now be isolated with a transparent background, preserving fine details like hair and other complex elements.
Finishing Touches: Make any necessary adjustments, color corrections, or enhancements to the image to achieve the desired final result.
Benefits of Model Photoshop Alpha Channel Masking:
Precision: Alpha channel masking allows for pixel-level precision, resulting in accurate and detailed cutouts around the model's edges and fine elements.
Natural Look: Models are seamlessly isolated from their backgrounds, giving a natural and professional appearance to the final images.
Versatility: The isolated models can be easily placed on any background or integrated into various design projects without any visible artifacts.
Complex Element Preservation: This technique ensures that intricate elements like hair, fur, or translucent objects are preserved without any loss of quality.
Model Photoshop alpha channel masking is widely used in the fashion industry, advertising, and other areas where precise cutouts and object isolation are essential for creating visually appealing and high-quality images. It requires skill, attention to detail, and a keen eye to achieve flawless results that enhance the overall presentation of the models in various creative projects.


Comments
Post a Comment